Los mecanismos son sistemas complejos de bloques que se usan para realizar ciertas tareas, tales como abrir puertas desde cierta distancia o mostrar escalinatas ocultas. Estos sistemas están construidos a partir de componentes sencillos y normalmente requieren cierta intervención del usuario, como romper una antorcha, la cual genera algún tipo de resultado, como descubrir alguna puerta oculta. Los mecanismos van desde simples switches que abren y cierran puertas a distancia segura, hasta complicados dispositivos como combinaciones de seguros que previenen la entrada de intrusos a tu fuerte.
Esta página es un trabajo en progreso, así que siéntete con la libertad de agregar tus propios componentes y mecanismos que tu construyes y que el juego desarrolla. Agregar imágenes es recomendado, pero no obligado.
Componentes
Estos son los fundamentos, partes modulares que pueden ser combinadas para formar cualquier mecanismo complejo. Por favor toma nota que los elementos individuales en el juego no se consideran componentes.
Componentes físicos
- Agua Canal
- Un canal en el cual el Agua puede fluir. A menudo se usan para romper antorchas, causando que ciertas cosas caigan.
- Tubo
- Una estructura de tres por tres que puede ser usada para lanzar TNT u ondas de choque
- Pistón Switch
- 1 bloque sobre el nivel de la tierra con redstone encima. Pistón that moves across to stop circuit. Used so pressing a Button or Lever will stop another circuit.
- Tubo
- A pipe of Hoppers or clock-fed Droppers used to transport items.
Componentes de redstone
Ver "circuitos de redstone" para una vision general de simples componenentes y Tutorials/Advanced Redstone Circuits para mecanismos de redstone mas complicados.
Mecanismos
Dispositivos útiles hechos a partir de la combinación de componentes.
The Day Commander
Mob Farm Using Tripwire And Pistons. 5364 Drops/Hour and Over 1 Stack of TNT In 20 Minutes.
Nether Wart Farm
A New Type of Reed Farm
Obsidian Generator
Redstone Lamp Disco Floor A redstone operated lamp floor that alternates to give a flashing/disco floor affect.
Visitor Counter A piston, redstone and pressure plate door that counts which way someone went through a door.
Fully Automatic Reed/Sugar Cane Farm (AFK).
Space efficient reed farm.
- Dispositivo de rayos-X (NOTA!en algunos servidores no se tiene permitido hacer esto, dado que haces "trampa" para encontrar recursos!)
- Este dispositivo usa Glowstone y Pistons.
- Pitfall Trap Using Pistons (Good for SMP)
- Semi-Automatica granja deCocoa Bean usando agua
- Semi-Automatica granja de Pumpkin o Melon
- Una granja de Pumpkin y/o Melon que puedes cosechar con un unico toque de Pressure Plate.
- Semi-Automatica granja de Reed
- una granja de Reed que puedes cosechar con un simple toque de un Button.
- Semi-Automatic Wheat Farm
- A Wheat farm you can harvest with a single switch of a Lever.
- Redstone Lamp LightHouse
- A redstone wired sequence of Redstone Lamps to mimic the lighting of a working lighthouse. Video below.
- Snow Generator
- This machine generates snow.
- Potion Dispenser
- Make a dispenser dispense Splash Potions.
- Place a dispenser one block over the floor level. Then place a Fence on the side the dispenser will shoot the potion out from. Then put a Pressure Plates on top of the fence.
Here is a video on how to make this:
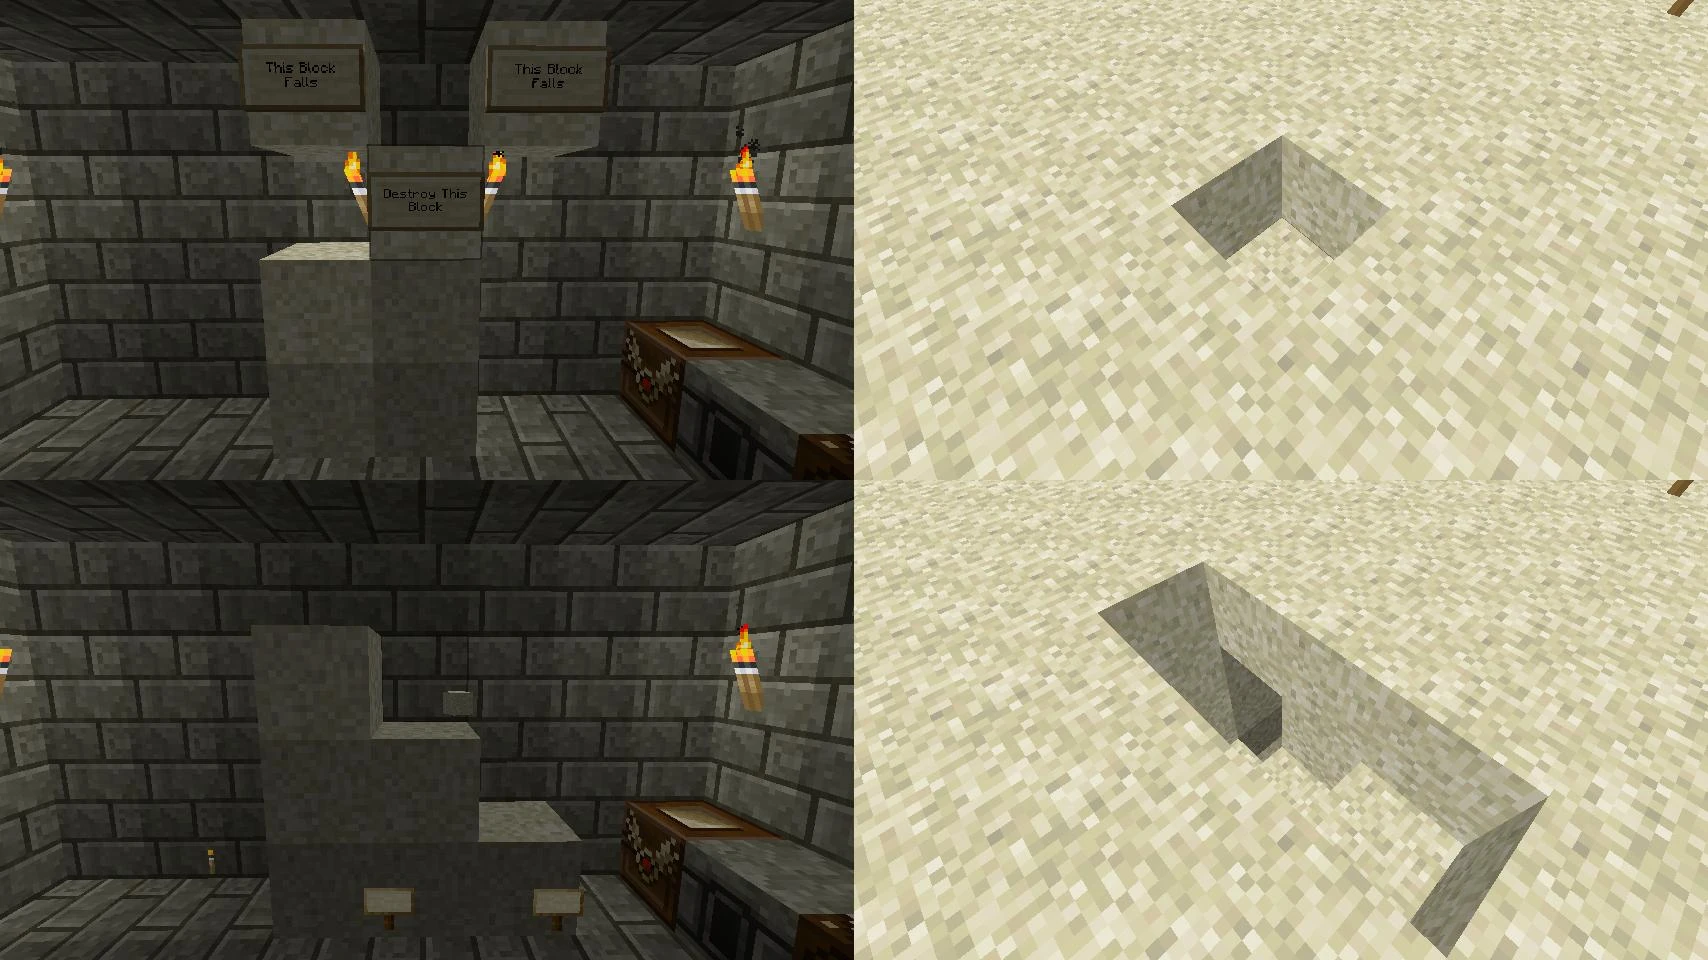
- Hidden Floor Staircase
- Hidden staircase in the floor revealed by breaking a torch.
- Make an inverted Sand or Gravel staircase in the floor of a room(one block wide), supported by torches. Make a Water channel or Water channels adjacent to the torches so that when they are filled, the torches break and the stairs will fall. (IMPORTANT: make sure that that the Sand or Gravel will cover the Water hole after it falls to avoid flooding) Make a Sand switch which opens a reservoir allowing Water to flow down a short channel to a pit. The pit allows the Water to drop beneath the floor and run to the torches holding the staircase.
- Hidden Wall Staircase
- Hidden staircase in the wall revealed by pulling a Lever, pressing a Button etc..
- As there are many ways of making this, and it is quite hard to understand,
- a video has been provided:
- Redstone Lamp Floor
- A redstone wired sequence of Redstone Lamps to mimic the lighting of a working floor. Video below.
- Rapid Pit Bomber
- A Dispenser attached to a redstone clock mechanism and Hopper to feed it items. In front of the dispenser, place a Powered Rail on a Block of Redstone and fill a Chest above the Hopper with Minecarts with TNT. This will rapidly dispense those rail-riding explosive atrocities onto a powered rail and into a massive crater of their own.
- It can tunnel down to bedrock given enough carts.
- Hidden Ceiling Staircase
- Hidden staircase in the ceiling of a room
- Make a Gravel or Sand staircase in the ceiling of a room supported by torches connected to blocks of Sand supported by more torches. Make a channel run next to the lower torches and back to a reservoir. Make a Sand switch that can open the reservoir. When the torch in the Sand switch is broken, Water should flow down the channel breaking the first set of torches causing the Sand to fall. The Sand would both close off the channel to negate flooding and break the torches attached to it, causing the staircase to fall.
- Example of one 'step' and the reservoir system
 %%%%%%%%%%%%%%%%%%%%
 %%+%%%%%%%%%% %%
 %%+%%%%%%%%%%+~~~~%%
 %%+%%%%%%%%O +~~~~%%
 %%^+%%%%%%%%%+%%%%%%
 %% ^O%%%%%%%%+%%%%%%
 %% %%%%%%%%%%+%%%%%%
 %           %+%%%%%%
 %           %+%%%%%%
 %            ^%%%%%%
 %           % %%%%%%
 %%%%%%%%%%%%%%%%%%%%
- % = Stone
- + = Sand
- ~ = Water
- ^ = Torch
- O = Channel running 'into the page'
- Assuming the two channels in this picture are connected, when the torch near the floor level is broken Water from the resivour will flow to the other torchs and drop the 'step' down to the floor. other sequential steps can be added to make a staircase.
- Hidden Sand Stairs
- Look at it properly to understand.

Redstone Mechanisms
- Combination Lock
- A door which is opened by using levers to input a certain combination. The levers are wired to an "AND" gate, with hidden redstone circuitry to open the metal door.
- Cobblestone Farm
- A farm which uses a clock circuit, water, lava and pistons to farm cobblestone.
B= Any solid block R= Redstone W= Water L= Lava T= Redstone Torch E= Redstone Repeater P= Piston
Layer 1
      BBBBBB
     BW    WB
       PPPP
       EEEE
Layer 2
       BBBB
      BLLLLB
       BBBB
Clock Circuit: Google search "Clock Circuit in Minecraft" and pick one that works, then wire it to the redstone repeaters. Sorry, I could not get the picture of the one I used onto the wiki page.
The Clock Circuit should blink on and off, and eventually you will have 44 blocks of stone. (11 for each Piston)
- Rapid Smoker
A device that rapidly produces smoke. To build dig a 1x1 hole in the ground and place a ring of cobblestone 1 block above the surface, with the hole of the ring above the hole in the ground. Now place Lava in the middle of the cobble ring, then place Water next to the Lava on the surface. Now put two repeaters set to 1 tick next to the Water. Place 2 pieces of redstone infront of the repeaters next to the Lava, then hook up a repeater clock and connect it to the redstone. It should look like this. Archivo:Rapid Smoker.png
And you now have a rapid smoker!
- Item Activated Door
- A door that only opens when an item is dropped into a pit of Water.
- Make three-deep a pit near an iron door. Build a level channel away from the base of the pit. Place a wood Pressure Plate in the channel no more than 8 blocks from the base of the pit. Wire the plate to the door (not through the channel). You will have to run the wire back up to the surface, or very nearly so, but it can be concealed under well-placed walls. Cover the channel and place a block of Water at the top of the pit, allowing Water to flow down the channel. Any item thrown in the pit should flow down to the plate and cause the wire to activate, thus opening the door.
- Flashing Indicator Light
- A blinking red torch activated when a Pressure Plate is stepped on. Can be used to tell if mobs are sneaking through your caves.
- Make a Pressure Plate wired to the input of a red torch. Wire the output of the first torch to the input of a new red torch. Run the output of the new torch to its own input, creating a blinking loop. Wire the output of the new torch to the input of any other torch to carry the blinking effect.
- Example:

- The loop on the right will flicker on and off when the plate is stepped on.
Warning: This burns out quickly if a single torch is used, so take this fact in mind.You can also use a redstone repeater to slow down the process on the loop back to the torch so it does not burn out
- Multiple torches hooked up:

- Sound could be added to make an alarm by wiring note blocks to the flashing torches.
- Block Destruction as a Trigger
- It is possible for an electronic output to be generated as a result of a block being destroyed. To achieve this, place a Redstone Torch on the side of a block facing away from you. Next, set up an inverter between the block and your mechanism. When the block is destroyed, the torch will fall, the lack of input will be inverted, and the mechanism will activate. This can be used to make traps, as shown in this video:
- Redstone Tower
The bottom torch powers the block above it, powering it and all redstone torches attached to the block. Each level (block with torch on top) acts like its own repeater. This also can go upward until the map ends while still producing power. If you want to dispose of this quickly or are making experiments just use Gravel or Sand for the block type.
- GlassSwitch
The glass allows the redstone current to pass through while the other moveable blocks do not. This can be used to operate doors, bridges, etc. The best part is you can use multiple Buttons and make doors that open from both sides using the same circuit. The tutorial can be viewed here:
. There are also images with pistons.
- 2 Wire Control
- With a lot of repeaters and AND-gates it is possible to control multiple outputs with only 2 wires. It can be very tricky to get the timing right. You need a pulse generators in both wires to get a pulse with a defined length and in most cases the output pulse needs to be made longer. As shown in this video you have a top wire and a bottom wire with repeater. On one side you have repeater between the Buttons on the top wire and none (or as needed) in the bottom wire. At the other side none (or as needed) on the top wire and matching repeater (to the others top side) on the bottom one. between which you place AND-gates (matching the Buttons). The Idea is that the signals only meet at one AND gate at the same time.
- Video tutorial:
- Example use:
- Redstone "Clock"
- When working redstone, when activating the wire, it only does its job once. Sometimes this is good, like with doors, but sometimes this isn't good, like with note blocks. A simple way to repeat the current is the "clock" as follows:
Dig four 1 block holes in the shape of a cross without the center. Place redstone torches in the holes. Place blocks on top of the red stone torches. This is not part of the process, but is need when actually powering something. Place one block of redstone in the center of the cross. This will cause the redstone to restart rapidly, which can be useful when working with note blocks.
Piston Doors
1x2 flush with the wall piston door. Fitting in a 2x4x4 space
1x2 Hidden Piston Door
Piston doors can be as easy as 4 Sticky Pistons attached to blocks that move inwards revealing a 2x2 passage way, or as complicated as the one seen in the original Piston revealer that Mojang released. (as seen here
)
These "Jeb doors" can also be referred to as flush-inset Piston doors. Here is an example of one of these, with a redstone torch key system added on. Once broken down, it's not extremely difficult to build.
For an easy Piston door with no Sticky Pistons:
For a Piston door with no Pistons visible:
Piston Gates
Piston gates, or portcullises, consist of a large set of fences that will be pushed up when the gate is opened, and down when closed.
Here is a very small and resource efficient build with a fluid opening motion:
More complicated Redstone circuit mechanisms are on Tutorial/Advanced Electronic Mechanisms.
Piston One-Way Elevators
5x4
This design allows one to get a great view on the surroundings and enables you to connect and stop on any floor you want. The video also contains horizontal Piston transport.
4x4
or
This design is even more compact than the previous one, however it blocks sight. Great for building elevators in shafts. Note: As of 1.2.5 update you need to set the pistons to 3 instead of 2. The first is still to be set on 4.
Piston Two-Way Elevators
Two-way elevators can be built, but they are slower and much more complex than the previous ones. They also require a lot more space and resources. The below is a slightly modified design by CxoLethe.
The two-way elevator can be built the following way:
The engine shown below of this text uses wool between the pistons and the fence gates/trapdoors. However, instead of wool any other block can be put there, as long as pistons can push it.
The engine
Front view schematic of the elevator
The schematics for the wiring assuming that you know how to make a 1 tick long impulse. A 1 tick long impulse can be obtained using a pulse limiter. In both of the schematics, empty squares represent air blocks, and repeaters all have the minimum delay possible.
Wiring that makes the elevator go down
Wiring that makes the elevator go up
A screenshot of an implementation of this design:
Screenshot of a two-way elevator using this design
Launcher Pads
A launchpad is similar in design to a TNT cannon, but instead of launching horizontally, it launches vertically either straight up or at an angle, depending on the design. There are many ways to create them, but some methods are more efficient than others. For instance, a simple design would be the cross pattern, as shown below.
This is what it would look like from above:
  S S
 @~%~@
S~~%~~S
 %%&%%
S~~%~~S
 @~%~@
  S S
- ~ = Water
- S = Water source block
- @ = Building block
- % = Building block with Redstone on top
- & = Building block with pressure pad on top
The above design can easily be expanded in size and improved, but it is one of the easiest designs so far. Another simple design, yet much more powerful, is here:
Redstone Torch
~ is redstone wire o is redstone repeater
~~ ~O ~~
After you build it put a torch down then take it way. You will have an everlasting redstone torch.
Cannons
- Artículo principal: Tutorials/TNT_Cannons
A cannon is a mechanism that uses TNT to launch TNT or other entities. Cannons come in many sizes with many additional features including multiple shots, and semi-automatic reloading. Cannons have two main TNT groups, the Charge and the Shot. The Charge is primed first and the Shot is primed before the Charge explodes. Simple Cannons don't require much redstone knowledge, but as features are added (variable delay, for example), the redstone component can become much more advanced. Here is a simple tutorial on how to make one ( Noting that a cannon could be used by a griefer to destroy other players' homes from a distance)
You can also fire sand/gravel and anvils with slight changes to the muzzle of this device (griefers love this as it poses serious threats to other players). although the timing is very hard to get right.
One-Button TNT cannon
By using a Button along with 5 Redstone Repeaters, you can easily create a TNT cannon that can shoot TNT.
One-Button Cannon with a Minecart used as delay
This cannon is automatic, once you press the Button, it not only lights up the "boosters" but also sends a minecart around the cannon that triggers a detector rail, which lights up the charge. Saves redstone, but takes a lot of iron (However, if you get rails from abandoned mineshafts this design can even save you resources!).
Human Cannon
A human cannon is a simple mechanism which allows the player to launch himself in the air, by using TNT and water. You can make a very simple cannon by excavating a 3x3 hole 1 block deep, then putting water on the center block. Place TNT all around the 1 water block. Then cover the TNT with obsidian, or any other solid block. Place redstone dust on top, climb in, and put a button on the block above the TNT. Here is a simple tutorial on how to make one:
Building Protection Sensors
The following are circuits designed to prevent changes to your structures without the use of Admin Powers.
Wall Protections
There are multiple ways of protecting a wall. Firstly being the easiest which is to protect the bottom of a two high wall, players going through it would break both and ergo the bottom as well, this trips the circuit giving you a positive redstone circuit.

An example.
(X) stands for a floor / wall of any material that redstone can be placed on. (-) stands for redstone. Below is a 2D cut of a piece of the wall. The principle of it is that when the lower block is broken the circuit is then connected.
XXXX
XXXX
 X
 X--
X-XX
XXXX
Door Protection
Iron doors are good and strong, however their ability to be broken is their major problem. One of the best ways of avoiding this is as follows.
To avoid the problem with a torch being placed to open the door easily place an iron door in a position so that its ON state blocks the entrance, then by powering it from beneath, you can stop it from being opened.
To then avoid someone breaking the door, place a block of Water above it, then another torch a block away behind the door. When the door is broken, the Water falls down and breaks the torch, giving you a negative which can be used.
X stands for ground. w stands for Water. I stands for torch. - stands for wire
XwXXXXX
 |
 | I---
XXXXXXX
Also, instead of Water, try Lava.
However, due to the slowness of Lava (and Water), it may be beneficial to make a Sand or Gravel block drop, dislodging a piece of wiring or a torch.
Liquid redirection technology
Redstone circuits can be used to redirect the flow of Lava or Water in the following manner:
These systems can be useful in many complicated mechanisms, or simply for aesthetic value.
Sensors
Light Sensor
With the improvement of villager AI in the most recent snapshots (post-1.1), compact, sensitive, and resettable day/night detectors can be created by utilizing their differing day/night pathfinding systems. (Note: This does not work in minecraft 1.2.4, due to the fixing of the bug that caused NPCs to be confused on not-full blocks)
This is a video showing how the smallest version is built and used.
A one-time use light sensor can be created using flowers and mushrooms, detailed in http://www.minecraftforum.net/viewtopic.php?f=1020&t=165642.
Block Updates
See Tutorials/Block update detector.
Other
Vertical switch
A vertical switch can be made using pistons and sand blocks. The uses is limited by the tower of sand which is placed in front of the piston. When the piston is activated by a button, the sand gets pushed down into a hole (or from a tower). In the bottom of the hole you have a torch and a repeater then nothing where the sand block is supposed to land. By adding a second repeater 2 blocks in line from the first one, you will have a broken circuit which is activated by the sand block which is falls down by gravity. Additional pistons can be used to push the sand at the bottom to reset the mechanism. For example by adding a Torch where the Sand falls when the mechanism is reset, you do not need to remove the blocks manually. There is still no way to generate Sand dynamically so you are dependent of a tower of sand at the top. This tower can be as high as you want (and Minecraft permits). The number of sand blocks available could be increased by having a second sand-tower which is supplied by another piston, when the first tower is empty.
Side view:
|= Air, S=Sand/Gravel, P= Piston, B=Button x=any block, <=Repeater, T= Redstone Torch, V= Void (endless space underneath bedrock).
  S
  S
  S
 |SPB
x|x
x|x
x|x
x|x
<|<T
Top- (left) and Front view (right) (only reset mechanism at bottom with sand block):
 B
 P         BPS|x
<S<T        xx|x
 |          xx|x
            xx|x
             xTx
Pressure Plate Trap
Make a 20 x 20 x 4. Put a layer of Water on the bottom. Put TNT on top of the Water, except for one pathway which you can get across with any block that doesn't apply to the laws of gravity. Put Pressure Plates on top of them.
Bank System
This is an updated, better, expandable bank system. This video also has an older bank system showing how to make one without using powered rails (broken link).
This is a simple bank system using powered rails, which should be helpful for Minecrafters less experienced with redstone.
Guaranteed Death Landmine
This form of landmine causes mobs to fall through a wide Sand pit being supported by TNT. the mobs will then fall into the pit and will be killed by the TNT.NOTE: This is NOT guaranteed to kill spiders, as they can climb out of the pit. No amount of simultaneously detonated TNT can kill a full-health player in diamond armor.
First, dig a 3x3x3 hole in the ground.Put a layer of torches on the bottom, then a layer of TNT, then a layer of either sand or Gravel. Now, put Pressure Plates on top of the pit.To confuse players, put Pressure Plates around a large area.It should look like this: 1=torch 2=TNT 3=Sand/Gravel 4=Pressure Plate 5=obsidian(optional,to keep players from breaking the wall to get out) 6=another block
 444
63336
52225
51115
NOTE: This is better to use on a beach or in a desert, because it is full of Sand
High speed item transportation & making items travel upwards
Since pistons came out, upwards item transportation became possible, and combining this with ice makes a high-speed item transportation machine. Ice under Water streams makes the items go a lot faster, so if you are living in a tundra biome, you get a big speed boost. If you aren't living in a tundra biome, it is still possible for you to make the machine (using silk touch or without the ice).
Detecting Redstone Placement
The new silent BUD switch design updates not only when there is an update going on adjacent to it, but also updates when there is redstone wire placed 1 block away from the BUD switch.
Powering Lamps without actually powering them
Lamps have a glitch, that if you power the redstone lamp directly, then make the wire turn it will stay turned on. See video for better explanation
Boat RS-NOR Latch
It is possible to make a boat-based RS-NOR latch and save up 4 redstone. Instead of the 6 redstone the old design uses, this design uses 2 pistons, therefore 2 redstone. Has a few disadvantages as well as advantages.
1 Wide ABBA switch
Basically as compact as it gets, this design is a very compact design of a 1 wide ABBA switch.
Race Finish Line
This Requires 1.4.1 of Minecraft. The new Redstone repeater latch can be used to create a "finish line" mechanism, to determine the winner of a race. At the end of the course, put a pressure plate for each lane. From there, make a wire for each lane, leading to a piston or lamp which will indicate the winner. Run a latch from each wire to the others. You may want to suspend blocks over the beginning of the wires, so your racers don't run over the mechanism. Extending this to more than two racers will be somewhat more comples, and probably require another level of circuitry.
!=switch @=redstone <,>,^,=repeater (<=Left) (>=Right) (^=up),%=piston
    % %
    @ @
    ^<@
    @ @
    @>^
    @ @
    ! !
Véase también
- Circuitos de redstone
- Traps